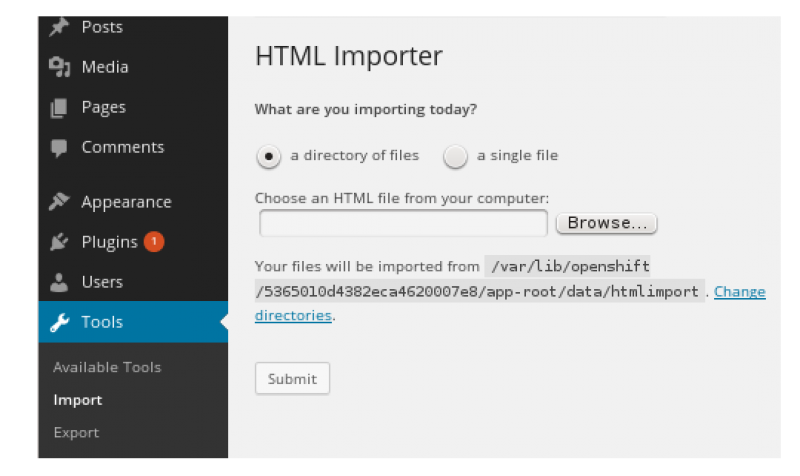
Static HTML websites are also popular for businesses which want an online presence but for a sophisticated business, a dynamic content management system, such as WordPress, is required. There are many ways by which you can import a static site into WordPress, but one of the most popular way is by using a most powerful and flexible plugins called HTML Import 2. This plugin is free, can be installed quickly and allows you to quickly convert your old HTML site and into new WordPress website.
For the business which harness the power of blogging, importing static content of old website into WordPress is the best way. If you convert HTML website to WordPress then you will get many benefits. Earlier there was not any tool or plugins to import HTML content to WordPress automatically so one has to copy and paste all page content manually. Now using the plugin, HTML Import 2, you can save lots of your time especially on large HTML sites and also you can import linked images. The Plugin HTML Import 2 is a complex plugin with many settings which we have to configure properly before start importing files.
After installing, HTML Import 2 plugin can import files, content, linked images, titles of posts, posts, pages, categories, products, tags etc.
First you need to install WordPress and then import plugin to start the process.
For a precaution, take a full backup of your files and databases before your start the process.
Files Settings
Directory to import - First enter the absolute url of the directory you want to import here. The plugin will show the absolute path from your web server hence make sure you have the correct directory.
For e.g. /home/hostg/publichtml/domain. You can also hire WordPress Web development services if you want to accomplish these tasks from some experts.
Old HTML Site URL :-
This URL will be used to generate accurate .htaccess redirects. The importer need not to search for files here.
Default file : You have to enter the name of the default file (index.html, default.htm) for directories on your old sites server. For e.g. index.html
File Extensions to include : Enter the file extensions, without periods, separated by commas. For e.g. Html, htm, shtml. All other file types will be ignored.
Directories to exclude : Enter directory names, without slashes, separated by commas. All files in these directories will be ignored. For e.g. Images, includes, Templates
Content Settings:-
Select content by - Select either HTML tag or Dreamweaver
Tag - The HTML tag, without brackets. For e.g. Div
Attribute - Leave blank to use a tag without an attribute, or when the attributes don’t matter such as <body> Example: id
=Value - Enter the attribute’s value such as width, ID or class name without quotes For e.g. Content
More options for Content:-
- Import linked images
- Update internal links
- Use meta description as excerpt which is checked by default
- Convert special characters (accents and symbols are checked by default)
- Clean up bad HTML(Word, Frontpage)
Title Settings:-
Select Title by - HTML tag or Dreamweaver template region
Tag - The HTML tag without brackets For e.g. Title
Attribute - Leave blank to use a tag without an attribute or when the attributes don’t matter much such as <title>
=Value - Enter the attribute’s value such as width, ID or class name without quotes
Phrase to remove from page title - Any common title phrase such as the site name, which most themes will print automatically
Meta Data Settings
Import Files as : Post, Pages or Products
Set Status to : Publish, draft, pending or private
Set timestamps to : Current or Last time the file was published
Set Author to : Add your author of the posts details to the users > Profile settings in WordPress admin and choose the author name
Importing pages as children of: None, You have to leave as top level unless you have sub or child pages of your parent page
Template for imported pages: Choose a page template your theme offers or use the default page template
Categories and Tags
Now you have to assign categories, tags and custom taxonomy terms to your imported posts. Here you have to setup your categories, tags and taxonomic in WordPress and then assign them to your old HTML sites posts.
After you have completed the import you may do some of the following tasks:-
- Check for broken links
- Change WordPress URL’s
- Fix broken links with permalink finder plugin
- Fix 404 page not found errors
It will be your one of the best move to import your old static HTML content to a new WordPress website or blog due to so many benefits which you will get after the import. WordPress is SEO friendly and well optimized for search engines and also has many SEO plugins which can further enhance your search engine rankings to attract more traffic on your WordPress site. After import you are not going to lose any search engine traffic if you don’t change your url permalink structure, internal links or page titles. Rather you will actually gain traffic after moving to the WordPress platform and it will be much easier to publish great looking content using a amazing looking theme which is very user friendly.
